1. 네이버 API 서비스 등록
1) 네이버 오픈 API로 이동한다. 링크
NAVER Developers
네이버 오픈 API들을 활용해 개발자들이 다양한 애플리케이션을 개발할 수 있도록 API 가이드와 SDK를 제공합니다. 제공중인 오픈 API에는 네이버 로그인, 검색, 단축URL, 캡차를 비롯 기계번역, 음
developers.naver.com
2) 애플리케이션 등록 > 애플리케이션 이름 입력 (test-project) > 사용 API 선택 (네아로) > 제공 정보 선택 (기본값: 회원이름, 이메일, 프로필 사진)

3) 환경 추가 (PC 웹) > 서비스 URL 입력 (http://localhost:8080) > 네이버 아이디로 로그인 입력 (http://localhost:8080/login/oauth2/naver) > 등록하기
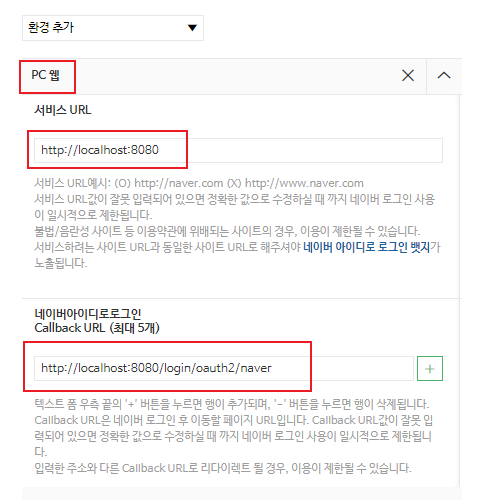
4) 클라이언트 ID, 클라이언트 Secret GET

5) application-oauth.yml에 로그인 해당 정보 입력
스프링은 네이버,카카오는 지원이 안되기 때문에 Provider를 직접 입력해줘야 한다. 왜 이 값들을 넣어줘야하는지 네이버 로그인 API 연동과정을 보며 살펴보자.
(스프링이 지원하는 서비스 : 구글,깃헙,페이스북,옥타)
spring:
  security:
    oauth2:
      client:
        registration:
          naver:
            client-id: 클라이언트ID
            client-secret: 클라이언트Secret
            redirect-uri: "{baseUrl}/{action}/oauth2/code/{registrationId}" # (== http://localhost:8080/login/oauth2/code/naver)
            authorization-grant-type: authorization_code
            scope: name, email, profile_image
            client-name: Naver
        provider:
          naver:
            authorization_uri: https://nid.naver.com/oauth2.0/authorize
            token_uri: https://nid.naver.com/oauth2.0/token
            user-info-uri: https://openapi.naver.com/v1/nid/me
            user_name_attribute: response
2. 네이버 로그인 API 연동 과정
application-oauth.yml에 적은 데이터들이 어떤 역할을 하는지 API를 참고하여 알아보자.
1) authorization_uri : 네아로 연동 URL 생성하기 #
네아로 연동을 진행하기 위해서는 네아로 버튼을 클릭하였을 때 이동할 '네이버 로그인' URL을 먼저 생성해야 한다. 사용자는 이 과정에서 네이버에 로그인인증을 수행하고 네아로 연동 동의과정을 수행할 수 있다. 사용자가 로그인 연동에 동의하였을 경우 동의 정보를 포함하여 Callback URL로 전송된다.
| 메서드 | 요청 URL | 출력 포맷 | 설명 |
| GET / POST | https://nid.naver.com/oauth2.0/authorize | URL 리다이렉트 | 네아로 인증 요청 |
2) 네아로 연동 결과 Callback 정보 #
네아 인증 요청 API를 호출하면 해당 Callback을 전송한다.
- 사용자가 네이버로 로그인하지 않은 상태이면 > 네이버 로그인 화면으로 이동
- 사용자가 네이버에 로그인한 상태이면 > 기본 정보 제공 동의 확인 화면으로 이동
- API 요청 실패시 에러코드와 에러 메세지 전송
Callback 응답 정보
- API 요청 성공시 : http://콜백URL/redirect?code={code값}&state={state값}
- API 요청 실패시 : http://콜백URL/redirect?state={state값}&error={에러코드값}&error_description={에러메시지}
3) token_url : 접근 토큰 발급 요청 #
Callback으로 전달받은 정보를 이용하여 접근 토큰을 발급받을 수 있다. 접근 토큰은 사용자가 인증을 완료했다는 것을 보장할 수 있는 인증 정보이다. 이 접근 토큰을 이용하여 프로필 API를 호출하거나 오픈API를 호출하는것이 가능하다.
| 메서드 | 요청 URL | 출력 포맷 | 설명 |
| GET / POST | https://nid.naver.com/oauth2.0/token | json | 접근 토큰 발급 요청 |
토큰 발급에 필요한 정보는 다음과 같다. 발급 받을 때 grant_type, client_id, client_secret, code, state의 데이터는 필수로 제공해줘야 한다.
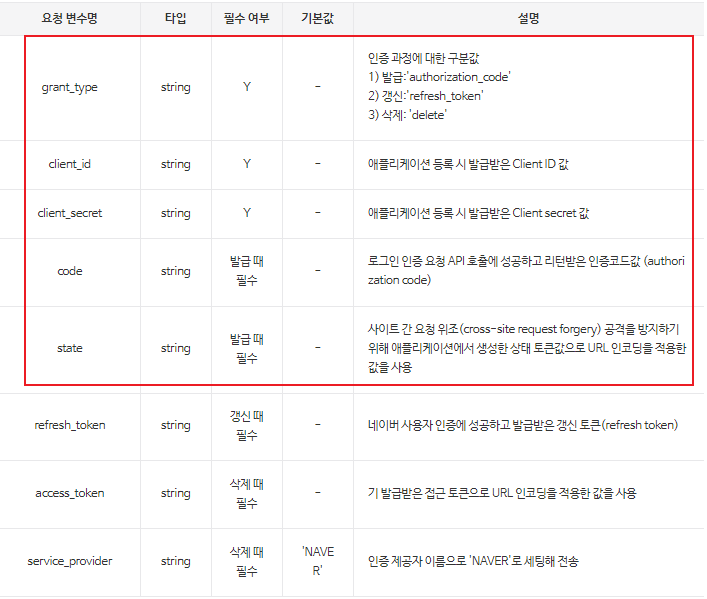
요청 URL 샘플
https://nid.naver.com/oauth2.0/token?grant_type=authorization_code&client_id=jyvqXeaVOVmV&client_secret=527300A0_COq1_XV33cf&code=EIc5bFrl4RibFls1&state=9kgsGTfH4j7IyAkg
4) 접근 토큰을 이용하여 프로필 API 호출하기 #
접근 토큰을 이용하면 프로필 정보 조회 API를 호출하거나 오픈 API를 호출하는것이 가능하다
* 사용자 로그인 정보를 획득하기 위해서는 프로필 정보 조회 API를 먼저 호출해야 한다.
user_name_attribute: response
요청이 승인되면 출력 결과는 response의 이름을 가진 JSON데이터로 주어지기 때문에 기준이 되는 user_name을 response로 입력해줘야 한다.
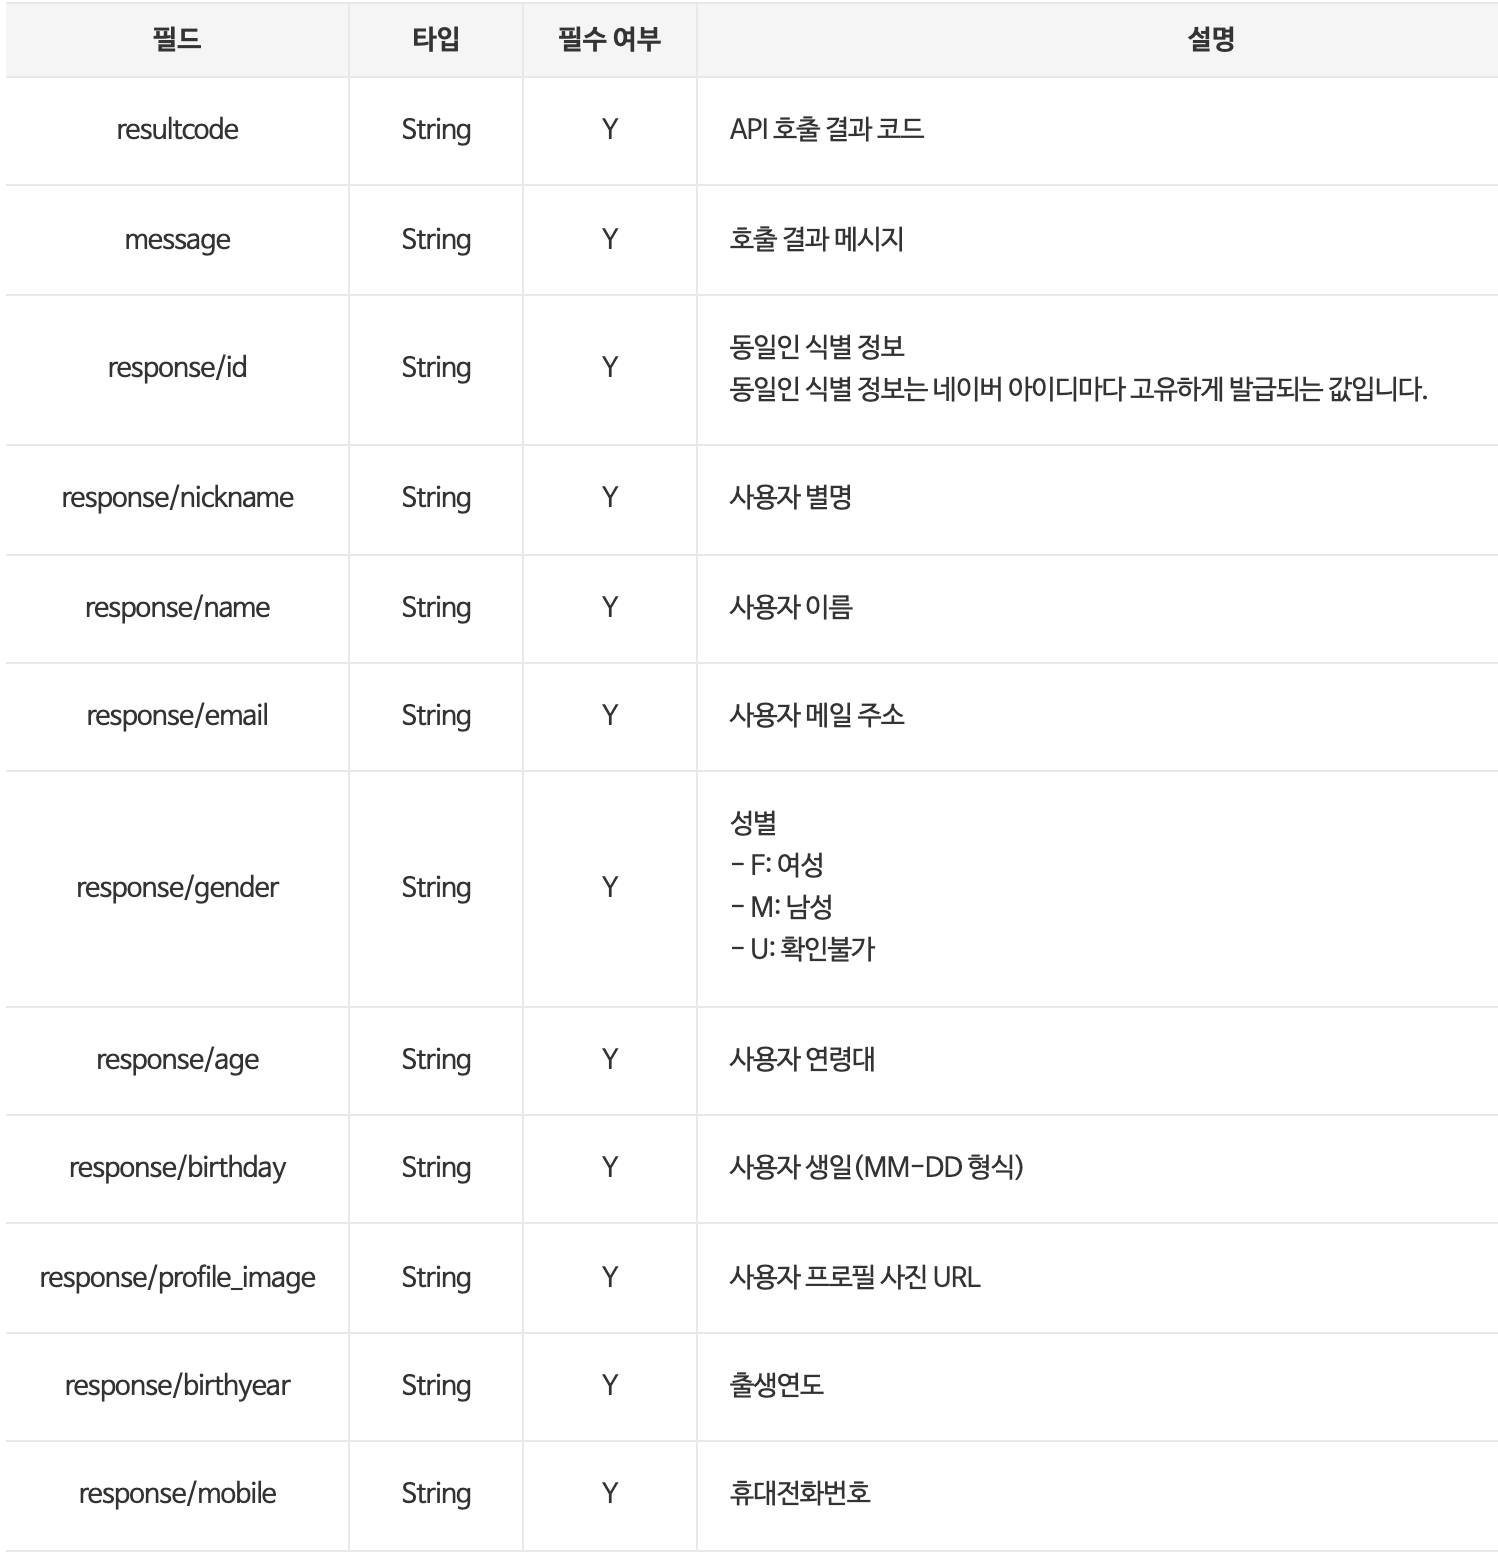
응답 데이터 형태
{
	"resultcode": "00",
	"message": "success",
	"response": {
		"email": "openapi@naver.com",
		"nickname": "OpenAPI",
		"profile_image": "https://ssl.plastic.net/static/pwe/address/nodata_33x33.gif",
		"age": "40-49",
		"gender": "F",
		"id": "33742276",
		"name": "오픈 API",
		"birthday": "10-01"
	}
}
3. 스프링 프로젝트 네이버 로그인 연동
[Spring] 스프링으로 OAuth2 로그인 구현하기1 - 구글에서 OAuth코드 기반을 잡아줬기 때문에 해당 코드와 이어진다.
1) OAuthAttribues
OAuth2UserService를 통해 가져온 네이버 OAuth2User의 attributes를 담을 클래스이다.
package com.loosie.book.springboot.config.auth.dto;

import com.loosie.book.springboot.domain.user.Role;
import com.loosie.book.springboot.domain.user.User;
import lombok.Builder;
import lombok.Getter;

import java.util.Map;

@Getter
public class OAuthAttributes {
    private Map<String, Object> attributes; // OAuth2 반환하는 유저 정보 Map
    private String nameAttributeKey;
    private String name;
    private String email;
    private String picture;

    @Builder
    public OAuthAttributes(Map<String, Object> attributes, String nameAttributeKey, String name, String email, String picture) {
        this.attributes = attributes;
        this.nameAttributeKey = nameAttributeKey;
        this.name = name;
        this.email = email;
        this.picture = picture;
    }

    public static OAuthAttributes of(String registrationId, String userNameAttributeName, Map<String, Object> attributes){
        //(new!) naver
        if("naver".equals(registrationId)){
            return ofNaver("id", attributes);
        }
        // google
        return ofGoogle(userNameAttributeName, attributes);
    }
    // (new!)
    private static OAuthAttributes ofNaver(String userNameAttributeName, Map<String, Object> attributes) {
        // JSON형태이기 떄문에 Map을 통해서 데이터를 가져온다.
        Map<String, Object> response = (Map<String, Object>)attributes.get("response");

        return OAuthAttributes.builder()
                .name((String) response.get("name"))
                .email((String) response.get("email"))
                .picture((String) response.get("profile_image"))
                .attributes(response)
                .nameAttributeKey(userNameAttributeName)
                .build();
    }

    // ofGoogle 로직 생략...

    public User toEntity(){
        return User.builder()
                .name(name)
                .email(email)
                .picture(picture)
                .role(Role.GUEST) // 기본 권한 GUEST
                .build();
    }

}
2) index.mustache
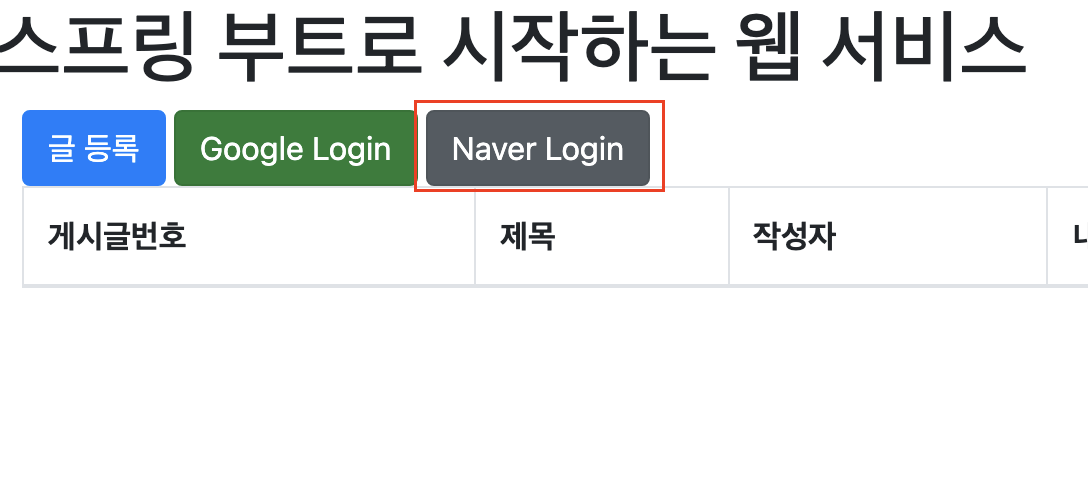
홈 화면에 Naver Login버튼을 추가해준다. url은 authorization_url로 연결시켜줘서 누르면 네이버 로그인 창으로 이동한다.
{{>layout/header}}

<h1>스프링 부트로 시작하는 웹 서비스</h1>
<div class="col-md-12">
    <div class="row">
        <div class="col-md-6">
            <a href="/posts/save" role="button" class="btn btn-primary">글 등록</a>
            {{#userName}}
                Logged in as: <span id="user">{{userName}}</span>
                <a href="/logout" class="btn btn-info active" role="button">Logout</a>
            {{/userName}}
            {{^userName}}
                <a href="/oauth2/authorization/google" class="btn btn-success active" role="button">Google Login</a>
                <!--네이버 로그인 추가-->
                <a href="/oauth2/authorization/naver" class="btn btn-secondary active" role="button">Naver Login</a>
            {{/userName}}
        </div>
    </div>

</div>

{{>layout/footer}}
웹 로그인 테스트
1) 네이버 로그인 버튼 클릭
authorization_url로 이동한다.
2) 네이버 ID, PW입력
아이디와 비밀번호가 일치하면 로그인 요청 코드가 담긴 콜백 url값을 보내고 그것을 oauth2.0/token이 전달받아 인증을 해준다.

3) 로그인 성공
인증이 성공하면 로그인이 완료된다.
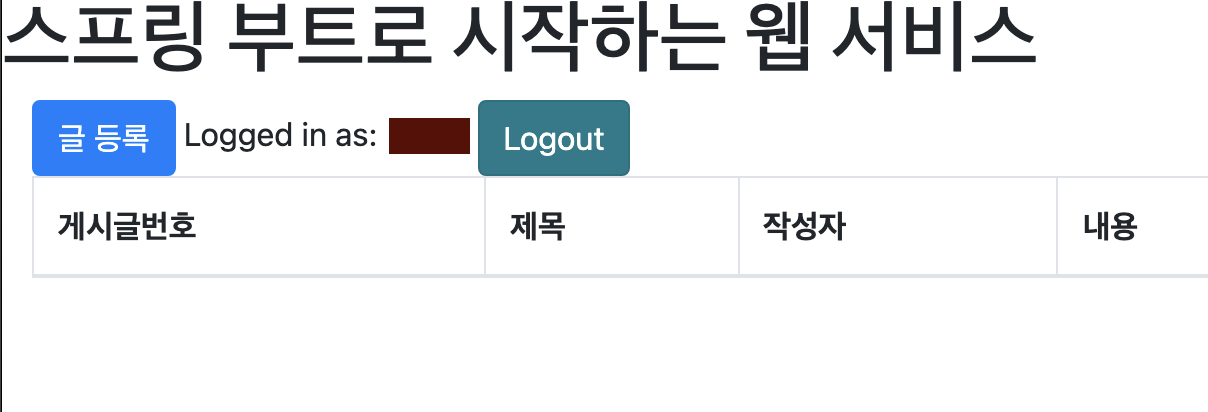
책의 내용은 여기까지였지만 추가로 카카오 연동도 해보았다. 카카오도 API를 보면서 설계하면 코드 틀이 잘 짜여져있기 때문에 손쉽게 구현할 수 있다.
[Spring] 스프링으로 OAuth2 로그인 구현하기1 - 구글
[Spring] 스프링으로 OAuth2 로그인 구현하기2 - 네이버
[Spring] 스프링으로 OAuth2 로그인 구현하기3 - 카카오
※출처
'Dot Programming > Spring' 카테고리의 다른 글
| [Spring] 로그인 유저 어노테이션 기반으로 정보 가져오기 (0) | 2021.06.25 |
|---|---|
| [Spring] 스프링으로 OAuth2 로그인 구현하기3 - 카카오 (2) | 2021.06.25 |
| [Spring] 스프링으로 OAuth2 로그인 구현하기1 - 구글 (0) | 2021.06.25 |
| [Spring] 스프링 프로젝트 계층 구조 설계하기 (레이어 아키텍처) (0) | 2021.06.24 |
| [Spring] Spring Data JPA란 무엇인가? (0) | 2021.06.24 |


